As you can see, not so nice. In fact, I called them “The Saddest Lamp Posts on the Block.” We didn’t have much budget to do anything fancy, but we knew we couldn’t continue looking at those sad, half-falling apart brick structures any longer.
We discovered these great 16″x16″ patio pavers at our local home improvement store and got the keen idea to stand them on edge together to create a concrete planter. This was one of the easier projects we’ve done and I think the result is pretty cool – very industrial, which fits more into our own personal style and gives our mid-century house a little bit of an ultramodern vibe.
Here’s what we used for each lamp post:
– 4 16″x16″ concrete pavers
– garden trowel
– a level
– 1-2 band clamps
– construction adhesive suitable for concrete/stone
– caulking gun
– a few old pieces of wood for leveling
– gravel and potting soil
(sorry I didn’t take the best step-by-step photos!)

We demoed the old brick lamp posts, which was oh so very satisfying.

Can you believe that this one was sunken in a plastic bucket full of concrete?


We started fitting them together to see what configuration would work better. We could stagger them and make the planter completely square, or create a rectangular box by placing one paver in between two side pavers. I was certain I’d like the square box, but after we looked at it, I just didn’t like how it fit together. The one exposed edge felt very unbalanced to me. We decided to go with the rectangular configuration.

Lulu wasn’t very helpful.

We then placed some scrap boards underneath to help us level it out. After we were happy with it, we used a fine bead of construction adhesive on each edge and fitted them together.

It takes a little finagling to get them to fit just right. Once the sides were level again and we were satisfied, we clamped it up and left it to dry for 24 hours.

The next day (OK, really it was the next weekend by the time we got back to it!) we removed the wooden boards and checked to make sure the box was level once it was on the ground.

We used a trowel to push some extra dirt into any uneven areas.

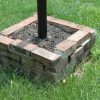
Ta-da! Then we filled the planter with half-soil (bottom), half-fine gravel (top).

And, now, we have the not-so-saddest lamp posts on the block. I can’t wait to plant some grasses in them next Spring.

In total, this project cost us under $75 for BOTH planters — I’d say that’s a deal. Plus, it only took us about two days. I think it would be kind of cool to paint them or put house numbers on them. I even thought maybe I could put corrugated metal on the outside… what do you think?