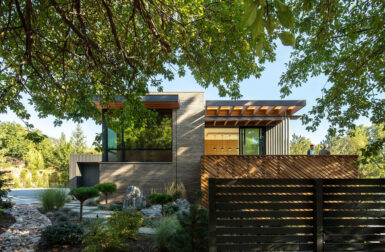
You might remember David van Alphen’s name from his Friday Five back in January. I invited him for our Deconstruction column because he built a fantastic modern shed in his backyard for just about $3000 without using a kit. I’ve been watching his progress for quite some time and hoped that he’d be up for sharing the project with you. Check out the process photos and David’s story, which might inspire you to build your own modern outdoor shed this Spring.
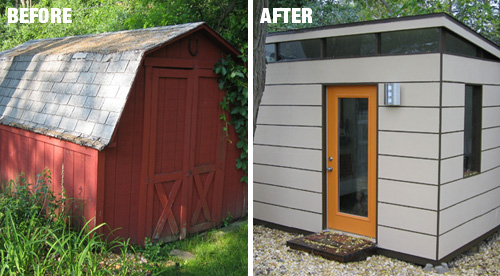
When we moved into our beautiful little ranch house, this is what was in the back yard. At first I thought it was a cute little shed but after further inspection, I saw that it was falling apart. Wood was rotting, walls were leaning and the floor was sinking.
Once I decided to replace the shed I decided that I would build a new studio in its place. As I said earlier, our beautiful mid-century house is small. This was my current working condition with my studio in the boys’ playroom. I think that’s all that needs to be said on that situation. I did some searching on the web and came across www.modern-shed.com. I loved the look of them but didn’t have the extra $11,000 to buy a prefab. So I decided I would build it on my own trying to keep the cost under $2500.
The first thing I started with was to remove the barn doors the front of the shed. After doing this, I realized how unstable the structure was and decided to call the professionals!
So I called the great guys at 1-800-GOT-JUNK. They actually offered to tear down the structure for me for FREE. Who wouldn’t want to do demo for free. If I wasn’t scared of knocking down my new fence, I would have been happy to. After they tore it down, I went through the pieces of scrap and salvaged as much of the wood as I could. Unfortunately because of the condition, it wasn’t much. Total cost for demo and haul-away — $275. Well worth it.
Since the old shed was on an angle, I had to move some dirt around to get the ground even again. I put cinder blocks in the ground underneath where the concrete corners to help keep the new studio from sinking. After everything was level, I built the floor using pressure-treated wood to keep it from rotting. Then I laid the plywood down. Floors done!
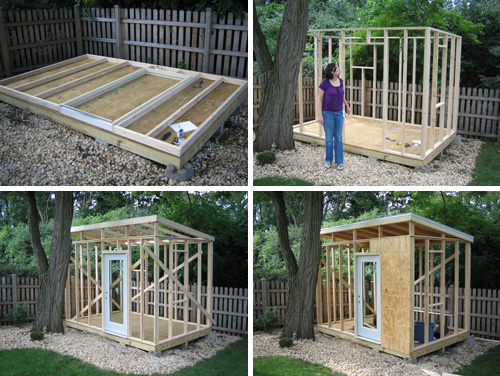
Then, the first wall went up. Within a couple hours, I had all four walls up. My wife Vicki give it the wind test by blowing on it. We do live in the windy City. Gotta be careful.
With the four walls up. Time to put the door in. I decided to spend a little extra on a nice glass exterior door to get the most light in. After the door was secure, up went the roof. This was definitely the most challenging part. I had to call the neighbor over to help me lift it onto the structure.
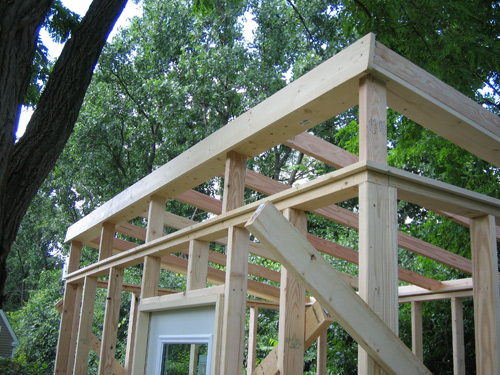
It was also tricky to figure out exactly where it would lay and make sure that all my dimensions were right.
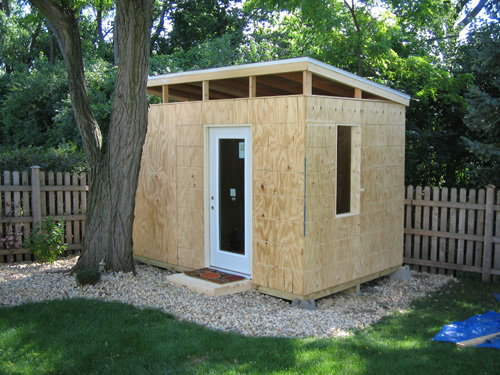
Once the frame was in place and everything was level, It was time to put the walls up. I used .75” plywood since I was routing grooves into them to give it the look of planks.
If you look closely, you can see the one that hasn’t been routed yet on the end. It was actually easier too to route the boards when they were already up.
My wife wanted a front stoop to have her morning coffee. I guess I could have made it a little bigger for her.
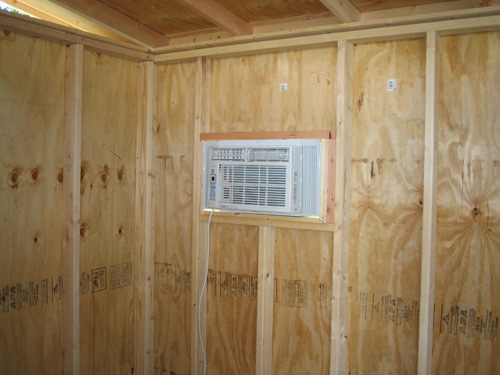
I built the AC unit right into the wall to save window space and make it less distracting.
Now for the electrical. This is always fun and exciting. Yeah, right. I actually had my dad out to help me with that so that I didn’t wake up to a midnight bonfire in my back yard.
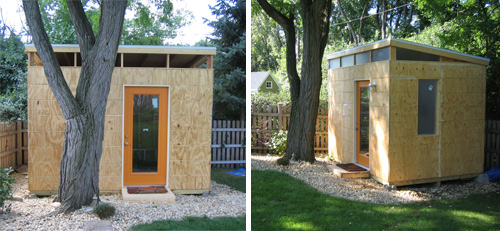
Took a little break from building and painted the front door. It is actually the same color as the front door of the house.
As I mentioned earlier, I have two little boys. So I thought it would be best to use Plexiglas. I also filled in all the cracks between the plywood.
Now that the outside is done, time to get to work inside. Up with the drywall.
One of my WTF was I thinking moments.
To save money, I decided to just stain the floor an espresso color. I also built a desk to run the length of the room and painted all the trim the same espresso color.
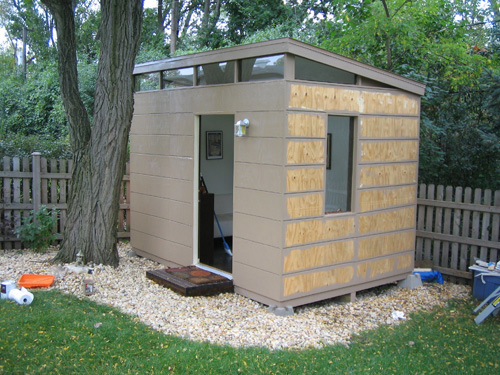
Now that the interior is done, it’s time to paint the outside. I put two coats of a khaki primer on that my neighbor gave me.
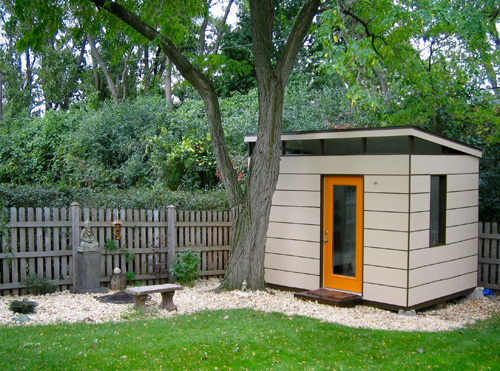
After the primer was dry, I painted the trim and routing grooves the same espresso color as the inside and painted the rest a cream color. I think the color scheme goes really well with the little Zen garden I made the Spring before.
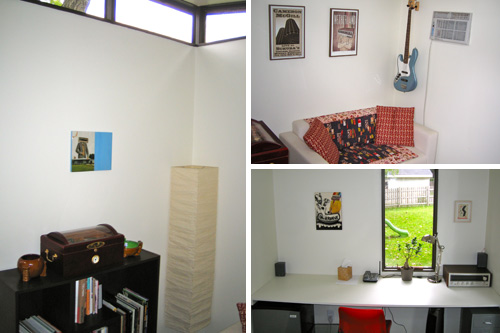
Interior view of the couch area, the desk with drawers and mini fridge. I still haven’t moved all the art supplies out yet which is why it looks so clean.
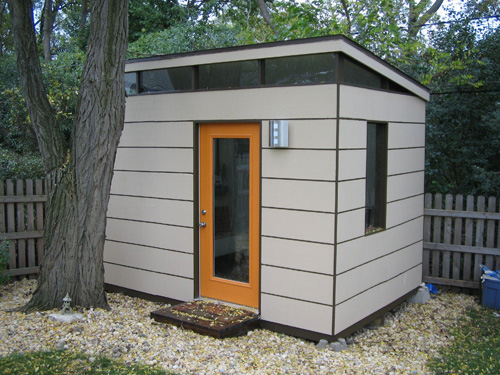
The last detail was the sconce on the outside. It actually took me about two months to find the right one that had a nice modern look and cost under $500! I got this for about $100. The final size of the studio is 8′ x 12′ and with all the extras I spent about $3000 total. Without the AC, fridge and other details, I could have easily come in under my $2500 goal.
58 Comments
Kate on 02.23.2010 at 09:29 AM
SO impressive! The space looks like a wonderful place to work.
Marticus on 02.23.2010 at 10:24 AM
Did you install ANY interior lighting, or is it all based on natural light?
If so, does it become problematic on a particularly cloudy day?
Just judging from my experience with construction, it seems like it would work out quite well though. I am 15 kinds of envious of that backyard / shed though – it looks exactly like somewhere I would want to live. And props for the budgeting – for perspective I just built a computer for about the same price as that entire shed with extras. =/
Deckdog on 03.12.2016 at 21:46 PM
Did you miss the step that showed the light switches?
Matthew on 02.23.2010 at 10:56 AM
Were there any zoning issues with running electricity to the new structure?
Deckdog on 03.12.2016 at 21:47 PM
Doesn’t look like it. As an electrician, there were code violations just in a simple switch box.
Chris on 02.23.2010 at 11:48 AM
Were there any building code requirements to deal with?
John Moss on 02.23.2010 at 13:16 PM
Gorgeous. I guess I have the same questions about zoning/code issues as others. It looks very nice, and I’m sure you’re enjoying the space.
footagehead on 02.23.2010 at 13:17 PM
Great job. Excellent space to work in. Be proud ! Wonderful job
and thanks for posting the progress pics.
David "Netherland" van Alphen on 02.23.2010 at 14:02 PM
Thank you guys for the nice comments. As far as the lighting, I have a floor lamp in the corner and a little desk light which is plenty. During the day I don’t need to use and because I get the morning light thru the front door and top windows from the East.
As far as permits, every place is different but in most, if it is under 100sq. ft. you don’t need a permit. Because I ran electrical…well…let’s just say I didn’t know I was suppose to and leave it at that.:)
Bart on 11.05.2011 at 19:16 PM
David what size is the door and what height did you max at?
Katrina on 02.24.2010 at 10:31 AM
Great post, I work in a garden office and love it. We often get asked to create them for our clients as well – you can see some on our web-site at http://www.earthdesigns.co.uk. There is a lok of garden office type products on the market now as more and more people seem to be chosing to work from home or the interior space is stretched.
jeff on 02.24.2010 at 11:14 AM
I think you might want to at least attribute the company whose design that you “followed”.
http://www.modern-shed.com/index.html
jeff on 02.24.2010 at 11:17 AM
Ah I see the attribution now….apologies for the rapid scanning.
Becky on 02.24.2010 at 17:35 PM
We’ve been thinking about doing the same thing ourselves. Looks great! Just wondering, how are you heating the shed?
Nadia on 02.25.2010 at 19:51 PM
Beautiful! I would love one of these as a little hermitage in my yard… if I had a yard, that is.
Did you install anything as far as moisture barrier in the floor or walls?
ts on 02.26.2010 at 13:18 PM
From a proper design and construction review standpoint, I am glad it is a shed and not a living space. Definitely not standard construction (and a big part of the cost difference.) All in all, a nice project – congrats.
Bench on 02.27.2010 at 03:59 AM
good
David "Netherland" van Alphen on 02.27.2010 at 09:15 AM
To answer a few of your questions, I have a small plug-in radiator. Since it is only 100 sq. ft. it doesn’t take much to heat the room. As far as moisture, I used pressure treated wood for the floor. ts- ummm…thanks.
Daniel on 03.01.2010 at 15:12 PM
Great job! I’m sure you’re happy you didn’t try to redo the old shed, and went with the new one, eh?
Aion kinah on 03.02.2010 at 01:10 AM
Very creative, very artistic.
John T. on 04.21.2010 at 21:51 PM
Looks great. I’m looking to do something similar and I was wonder where you sourced the windows for the top?
Brad on 06.08.2010 at 10:04 AM
Can you send me a close up view of the Plexi in between your Board and the name of the sconce.
Thanks
Brad
EJ on 06.15.2010 at 12:12 PM
Excellent, excellent project! I’m definitely making one of these for a man cave/dog house. Can you post details of the roofing? I live in Florida, does anyone know how to make this project more moisture resistant?
Angela on 08.29.2010 at 16:30 PM
I really LOVE your office! You did a great job. I was wondering what color (and where you got it) is your front door? Thanks!
bill on 04.20.2011 at 12:43 PM
Did you only paint the exterior? The modern shed uses hardi plank. $$$. Will the wood last long without siding? Nice work!
David D on 05.10.2011 at 22:46 PM
Beautiful design and finish. I have to redo a metal shed and I like the slanted flat roof with windows.
hans on 06.03.2011 at 14:29 PM
I love it. Any chance you have building plans that you followed? I’d love a copy so I can build my own.
Anya on 07.03.2011 at 11:39 AM
This is awesome. How long did it take you to build it? Did you only do it on weekends? I need plans for my county before I can get a permit. Do you have anything you can share?
Great job! What an inspiration.
mt on 09.06.2011 at 14:31 PM
for the external walls, did you just prime and and paint or did you seal the wood with anything? did you use pressure treated plywood for the outside?
Bart on 11.05.2011 at 19:13 PM
David 2 things on your shed, what size is that door and what is the max height at your pitch? Thanks
Mark on 02.08.2012 at 13:41 PM
Wow, this is EXACTLY what I have in mind for my backyard storage shed. Brilliant solution for the $$ Hardie Planks!
Questions:
1. What size router bit did you use for the grooves in the plywood.
2. You said it was easier to route once the walls were up. What did you use for a straight edge?
3. How far apart did you space the grooves?
4. Any chance for a closeup shot of the finished roof?
Todd on 03.20.2012 at 16:52 PM
What material did you use to finish the roof? Very cool project.
Bryan on 06.16.2012 at 17:22 PM
This is amazing! I do not have the skills or the tools to do something like this but really want one in my backyard. Do you know anyone in the Southern California (Los Angeles) area who could do something like this within the same budget (not including labor of course). Thanks.
Bozlogjam on 07.29.2012 at 14:09 PM
This is basically a rip off of Modern She’d (http://www.modern-shed.com/pricing.aspx)
Chelsea on 08.03.2012 at 11:38 AM
Above, he says, “I did some searching on the web and came across http://www.modern-shed.com. I loved the look of them but didn’t have the extra $11,000 to buy a prefab. So I decided I would build it on my own trying to keep the cost under $2500.”
It helps to actually read an article before commenting :)
David on 07.29.2012 at 14:24 PM
I guess you have no shame in knocking of someone else’s design. It’s saddening. I hope there are copyright laws against this. And the reason modern sheds.ca are more expensive is because they design them properly. Painted plywood won’t last with an insulated wall. I can smell the mould already.
Soekehuxna on 08.23.2012 at 13:39 PM
That’s like criticizing a car company for “copying” another cars design. It’s a fricken car! They all look similar to each other. There is not much deviation in design.
As in this shed, if you want a passive solar design, and God forbid horizontal siding, it’s going to look similar to the overpriced “modern shed”
If it does “mould” then he can rebuild it every 15 years for $3000 and still be under prefab prices.
I praise this builder for DIY. Everyone else, have fun burning your money!
Deckdog on 03.12.2016 at 21:53 PM
Moisture causes “mold” not “mould”.
Les Houches on 08.08.2016 at 09:47 AM
The spelling of mould or mold is different depending on your country.
bozlogjam on 07.29.2012 at 19:00 PM
Actually, although the basic design looks like it comes from Modern-Shed, if David was able to build it for around $3000, that’s pretty impressive. I bought a Modern-Shed (same size as David’s) several years ago and have been very pleased with it, however, it did cost 3 or 4 times what David’s shed cost to buy and have it installed. While the external design is similar, the internal design is very different to the Modern-Shed, so I think it unlikely that there would be any patent infringement. The clever thing about the Modern-Shed is its modular panel design – and David’s design doesn’t take this approach for the construction, going rather for more conventional framing. Which of course, is fine if you doing it yourself. All in all, I’m pretty impressed with what David has done, and the price is unbeatable. My only real comment, which agrees with a previous post, is that I would suggest acknowledging that the external design at least, is based on the Modern-Shed design.
Jaime Derringer (post author) on 07.30.2012 at 08:59 AM
Above, he says, “I did some searching on the web and came across http://www.modern-shed.com. I loved the look of them but didn’t have the extra $11,000 to buy a prefab. So I decided I would build it on my own trying to keep the cost under $2500.”
bozlogjam on 08.03.2012 at 21:45 PM
My mistake, I missed the reference to Modern-Shed in the article, which I wasn’t reading that closely. Probably should have. Anyway, I still think it’s a great backyard project — took a few notes myself.
Andy on 07.30.2012 at 00:08 AM
I’d have to agree with some others comments regarding the weather-resistance of the shed. Routing grooves into the ply may help to create the effect of planks, but also means rain and snow will be penetrating directly into the shed’s skin. As a remedy, I’d suggest installing a moisture barrier (tyvek or similar) over the installed plywood and then a rain-screen of vertical furring strips and hardiepanels.
sd on 08.03.2012 at 17:11 PM
If I may, modern-shed’s design is not original either. Modern-shed might have refined the design, but putting a shed roof over four walls is a no-brainer. I probably thought of making a larger house with that kind of structure, and this was way before modern-shed came into existence. Therefore, please go easy on this backyard DIY project, which is brilliant.
austin on 08.04.2012 at 10:36 AM
As a suggestion, rodent-proof the area underneath the shed.
Boise-man on 09.13.2012 at 14:29 PM
I love it. There are a lot of comments on moisture concerns, but I think this varies widely based on where you live. I spent many years in NW Florida…and I think this structure as built would not do well there. In a more arid or semi-arid climate, such as Boise, ID…this thing would last for a long, long time with no moisture issues at all.
But again…I love it. I’m truly inspired by it.
Chris Williams on 05.05.2013 at 07:47 AM
I love the shed, but I absolutely cringed when I saw your picture of the electrical switch. You have no strain reliefs/cable clamps on those wires. Please tell me you put them on before closing the walls up, it is a very unsafe design to not have those in place since it can be a serious fire hazard and they clearly are not shown in the pic.
Em on 10.26.2013 at 08:58 AM
I want one. This is amazing. I do agree with others about the moisture concerns. Modern-sheds is just too expensive and they were not the the first to create this design or a shed. I love this design and would love to recreate it in my backyard.
Greg Hale on 08.13.2014 at 15:15 PM
I love this post. Do you have building plans for it I could purchase from you?
Gil on 05.10.2015 at 08:51 AM
Love the shed! I will be attempting to build it. Was wondering a) if you are able to share your plans OR if not, just answer a few quick questions. How did you attach the plexiglass pieces (I don’t see any routed grooves or frames) and b) how did you created your guides for your router and what depth was it set at?
Thank you so kindly.
Gil
Aurel on 05.30.2015 at 14:22 PM
Hi David and congratulation for your project. Copyright is not an issue here you can find on the net DIY for free and is nothing special. From my point of view I did not get the info about electricity how you connect it. I don’t see wires on the roof maybe underground but this is a serious problem here in Alberta so if you have time please give us some details. Any brakers, surge protectors, electric panel ? Thank You for your time.
Deckdog on 03.12.2016 at 21:57 PM
Breakers. Not brakers.
Phil on 02.09.2016 at 02:55 AM
Hi! Like the design. I just built two smaller sheds which I was planning on sheeting with the same design you used. I was contemplating the corner connections between plywood sheets which is why I stumbled upon this page. May I ask how you finished the corners? It is not very visible in the photos. Did you use a bit of trim, or just a mitered corner?
Thanks!
Phil
Mark on 06.02.2016 at 22:05 PM
Love the shed. Working on something similar. What size router bit did you use. I want to try something similar. Thanks. Mark.
David on 07.21.2016 at 14:17 PM
Love the shed. Do you have this outlined in a plan or blueprint? I’d love to build one myself.
Thanks,
David
Chelsea on 07.28.2016 at 14:12 PM
Great work! This is inspiring me to start a DIY shed project instead of buying some ready made kit. Here is another shed project I found for a similar project I have been considering. Cool step by step pics at the bottom: https://diyatlantamodern.wordpress.com
Kris Anne on 10.10.2016 at 07:23 AM
There are plans online:
https://www.icreatables.com/sheds/shed-plans-modern
Modern-Shed is not the only game in town either! So, get over it.
There are also other companies:
http://retrorenovation.com/2014/07/15/sources-midcentury-modern-sheds/
Enjoy
SMR on 10.17.2020 at 20:24 PM
Hi! Beautiful shed.
How is it holding up over the past 10 years?
I noticed that the prefab model includes a thick beam to hold up the roof, presumably so that the clearstory windows around the front can be uninterrupted. How were you able to minimize the gap between the clearstory windows while still holding up the roof securely?
Thanks
Want your image to appear next to your comment? Get a gravatar!Leave A Comment