This might be the perfect summer project. Weaving is an amazing way to relax. The repetition and handiwork are incredibly cathartic—and when you’re done, you’ve made a place in which you can lay back and lounge.
That said, when you’re making things on your own, it’s easy to get caught up on what you don’t have instead of embracing what you do. When I started this project, I fell into that trap: I didn’t have enough room to weave something so large, I couldn’t mount hooks in my brick and plaster walls, and there was no way I could carve the time out of my schedule to do something as time-intensive as weaving. Still, I was intent on working with the massive amount of rope I’d acquired, so I just went ahead and swung into the project I had in mind… and it worked! The supposed limitations of my workspace sorted themselves out, and it took far, far less time than I assumed—just a nice, lazy afternoon.
This particular geometric pattern holds better than a traditional hammock weave, and the sail rope adds a nice touch of nautical contrast.
For a 6’ hammock, you’ll need:
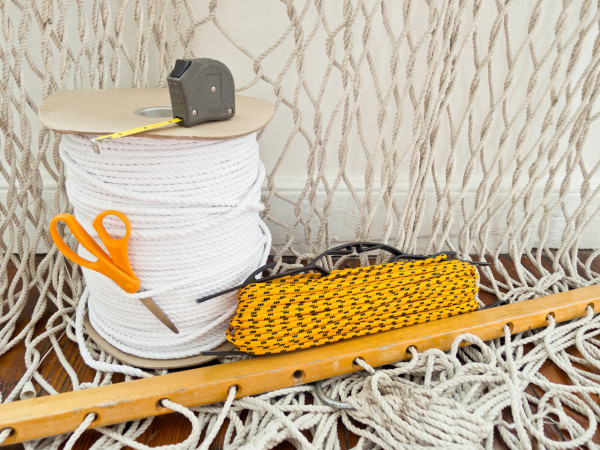
Supplies:
– 1000 ft skein of hammock rope
– 100 ft sailing rope in a contrasting color
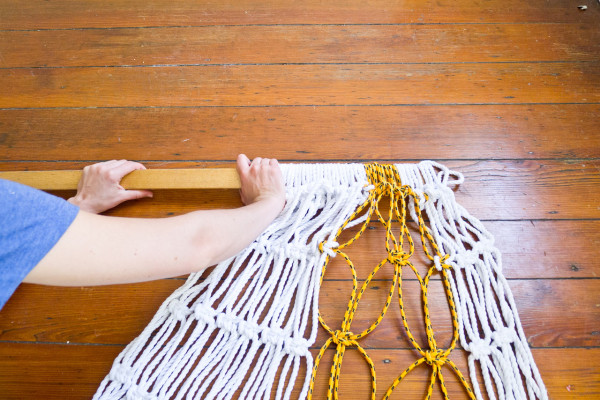
– 5’ long dowel or bar, about 1” wide
– scissors or utility knife
– masking tape
– measuring tape
– 2 large wall hooks (see below)
– Epoxy (optional)
PREP
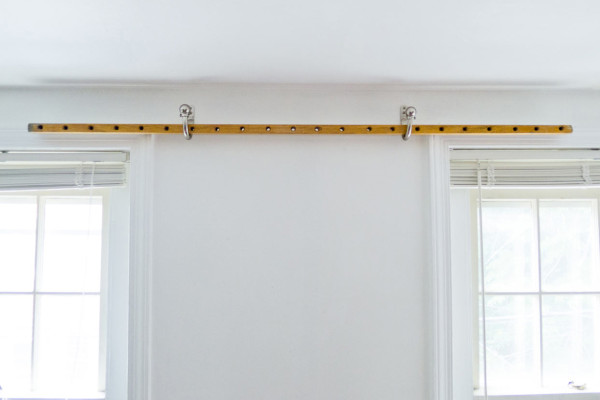
Step 1: Mount the wall hooks about 7’ off the ground, and lay the bar between them. If you’re in a pinch, like I was, you can prop the bar between two curtain rods, hang it from the ceiling – anywhere that will let the rope hang.
Step 2: Measure 17 lengths of hammock rope and 4 lengths of sailing rope, each 24’ long. To keep the rope from fraying, I found it easiest to tape the point at which I was going to cut the rope, and then cut the small taped section in half.
Step 3: Fold each length of rope in half, loop it over the bar, and pull it back through itself (technically, this is a cow hitch). I offset the group of sail rope lengths a bit from the center, for visual interest.
WEAVING
For this part, all you really need to know is how to tie an alternating square knot:
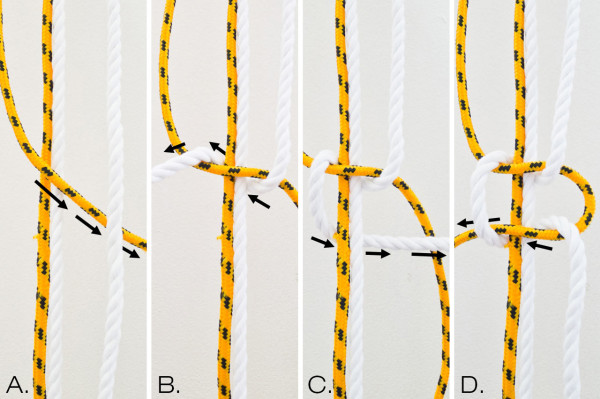
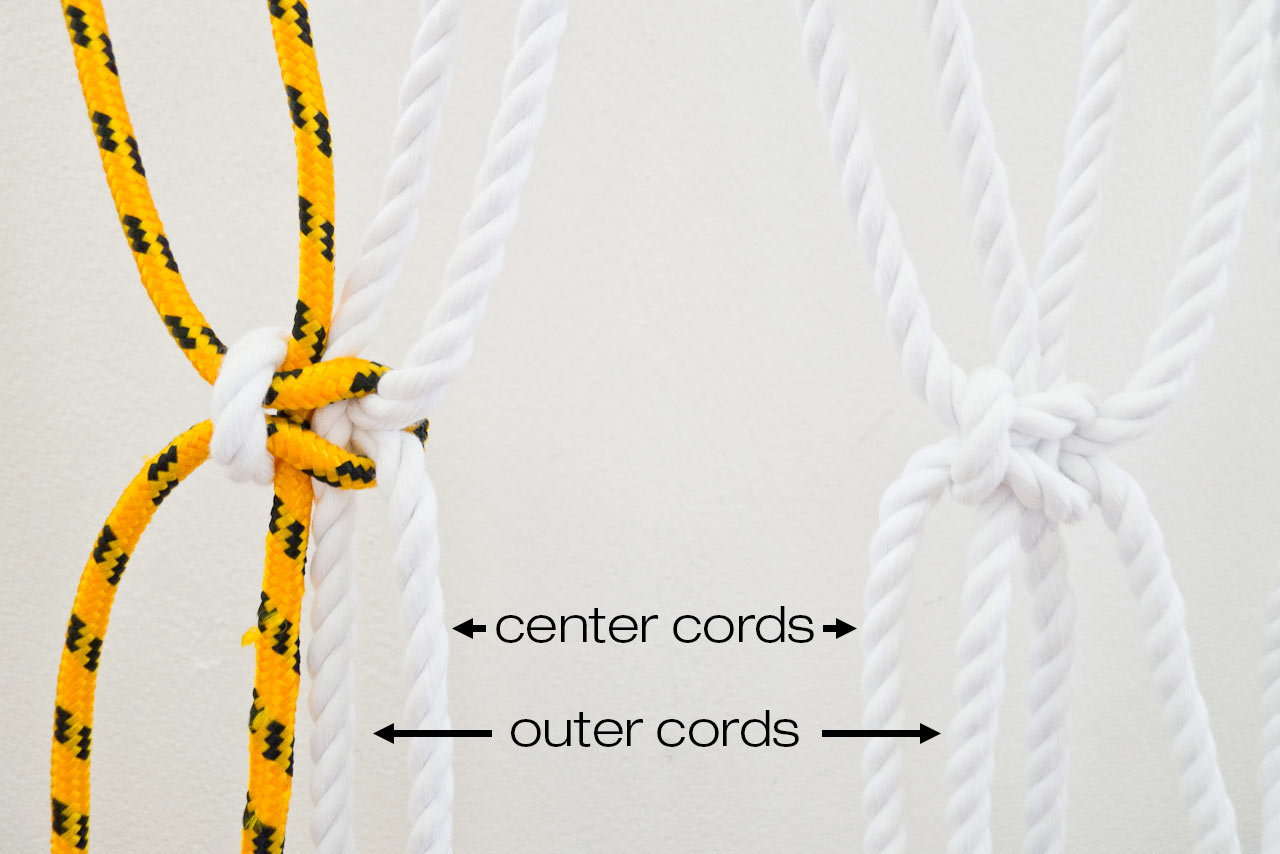
A. Cross the left cord (yellow) over the two center cords, and under the right cord.
B. Take the right cord (white) behind the center cords, and up through the hole, over the left cord.
C. Take left cord (white) behind the center cords, and over the right cord.
D. Cross the right cord (yellow) over the center cords, and then through the hole, behind the left cord.
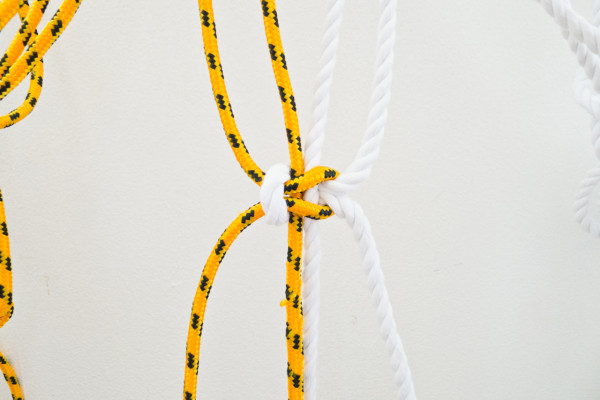
Pull the knot taut, and you’re set.
After that, the pattern is pretty simple:
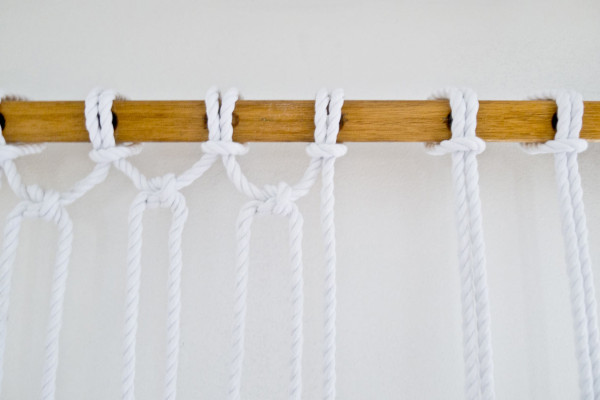
Step 1: Beginning somewhere in the middle, tie one leg of each looped cord to the cord next to it, using a plain square knot (the same as the alternating square knot, just without the center cords). Tie a row of these across the top.
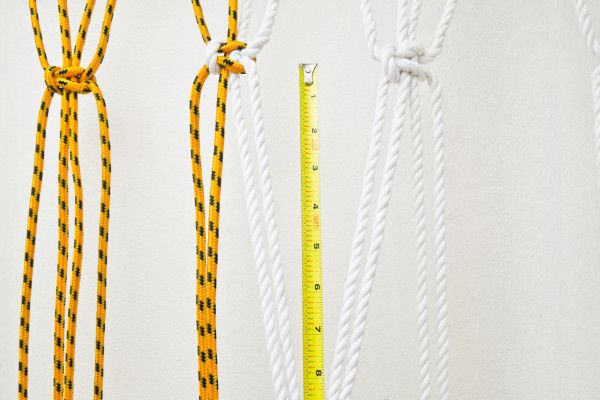
Step 2: Then, begin the alternating square knots. Again, somewhere in the middle, hold two sets of legs from two adjacent looped cords. About 6” down from your first row of knots, use these 4 legs to tie an alternating square knot. Do an entire horizontal row of these.
Step 3: Now, move another 6” down, and switch the center cords to be twice-removed from the knot above:
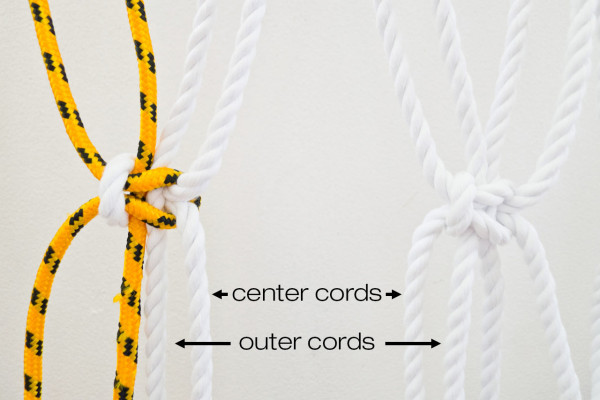
Do an entire row of these, and switch back to the cords in Step 2, repeating Steps 2 and 3 for the remainder of the hammock.
Once you get into a groove, this goes really quickly. When I reached the edge and had cord that wasn’t tied in, I just wrapped it through the nearest knotted cord once or twice.
Step 4: Work your way down by tying off rows of alternating square knots until you’re about 1’ from the end of your cords. At this point, tie off a plain square knot, the same way you did when you began. Alternate from the tied cords and do one last knot to create your final loops, to mirror the beginning of the weaving.
Step 5: Take down the bar, push off your loops, cut off any extra cord, and that’s about it. If you want, you can add a bit of epoxy to the end of each cord to keep from fraying.
When it comes to mounting the hammock, there are as many options as there are trees. I had a hammock clew left from a broken hammock, so I was able to tie off each of the ends through my old hammock bar, but I found a great tutorial here if you’re into taking the extra steps. Another option is to draw more rope or chain through the top and bottom loops, and secure that between a couple of trees or posts.
This same technique with a bit less space between the knots (about 3″ instead of 6″) creates a cool pattern of overlapping circles, which would be great for an outdoor rug or an airy summer curtain.
Now go take that nap you so deserve.

19 Comments
Nilmini Inoka on 08.16.2013 at 01:18 AM
hi Meg Kenner
. its really impressing to say i made a hammock on my own after seen this nice few steps of making hammock DIY. really thank for this piece of information that help others. i could have upload image sof my hammock if this allows.
Thank You…
Meg Kemner on 08.16.2013 at 13:19 PM
Hi Nilmini-
This absolutely made my week! We’d LOVE to see a photo if you have one. You can link to the photo in a comment, tweet us at @designmilk and @matterandtime, or tag us on Facebook.
Thanks – keep up the awesome makin’!
Nilmini Inoka on 08.18.2013 at 08:46 AM
HI Meg Kemner,
https://www.facebook.com/photo.php?fbid=660899527254373&set=a.300618796615783.83452.100000029951203&type=3&theater
This is fully finished my hammock. it cost me about 22Dollars(In Shri Lanka). I really enjoyed with this and already recommended this site for my handy friends.
Thanks Again Meg… <3 <3 <3 <3
Haiku Hammock Swings on 11.08.2013 at 13:42 PM
This is great. I was looking for a good rope to make a hammock with and I appreciate the link. Thanks.
sudheesh plathottam on 02.15.2014 at 00:44 AM
Nice, if you include a video it is much helpful.thank u
Meg on 05.06.2014 at 11:51 AM
Thanks for the tutorial!! I’m looking forward to making the hammock! THe issue I’ve run into is sourcing rope! I’m in canada and so the shipping cost of the link you provided is too high. Do you have a more detailed description of the type of rope I need or any ideas about where to look for one.
Thanks!
yuri on 08.06.2014 at 22:09 PM
If there is a mountain equipment co-op in your city – go there. They have excellent rope that they sell by length. probably can check out mec.ca as well!
Sally on 06.15.2014 at 19:56 PM
I found comparable rope on ebay, looking at the size that was indicated in the instructions. While I haven’t begun to make my hammock, it looks fairly easy.
Rusty Robinson on 07.05.2014 at 10:44 AM
Instead of the rope listed here, you can also use 550paracord. It is extremely light, but will hold a considerable amount of weight.
Nate on 11.25.2014 at 11:01 AM
Very nice tutorial! I’ve been thinking about making one of my own out of rope made with plastic bags.
Mike on 05.04.2015 at 03:13 AM
Hey Meg. I’m just getting started on my hammock and I unintentionally discovered what I consider to be a slight improvement.
For the alternating square knots, if you duplicate the top half of the knot for the bottom half (i.e. repeat steps A and B for the bottom half and never do steps C and D) you end up with a knot that sits flatter and doesn’t have an uncomfortable bump on the left side of each knot.
Here’s a picture showing my knot on the left and yours on the right:
http://oi57.tinypic.com/2crt4qv.jpg
Mike on 05.07.2015 at 06:00 AM
I also found a tidy way to deal with those pesky single ropes on the left and right sides. Instead of wrapping them “through the nearest knotted cord once or twice,” treat them and the neighboring rope as a single unit, and tie them right into the knots as you go.
This picture shows the left side of the hammock, with the extra single rope tied in with the knot: http://oi58.tinypic.com/23lktup.jpg
Amanda on 06.06.2015 at 20:46 PM
Do you have a picture with the completed hammock with the knots you did?
Fab on 06.05.2015 at 22:29 PM
Thanks, this knot is probably more comfortable as a matter of fact, but I am not too bothered by the bump created by the original knot.
I also thought your knot was a little longer to make than the original, but I might be wrong…
Fab on 06.05.2015 at 22:24 PM
Thank you so much for your instructions, this is the only website out there that is clear and illustrated.
I did this hammock on a hot week end here in Thailand, and I am pretty satisfied with the result (the choice of rope was not the best, but it was my first try) :
https://www.dropbox.com/s/qd2e8862og91y4m/photo%202.JPG?dl=0
https://www.dropbox.com/s/o9331bohn6u7e3h/photo%203.JPG?dl=0
I will probably do a hammock chair next.
Thank you again.
Joseph on 07.04.2015 at 11:00 AM
I feel like I’m missing something. Why do the instructions end with “push the loops off the bar”? Now you just have a bunch of loops laying on the ground. How do you mount them through the holes of the bar? How do you weave that pattern at the top where it connects to the ring?
Sean on 08.06.2015 at 14:44 PM
It does feel like a step or two might be missing, yeah. I’m not super clear on how to mount everything once you’re done the weave.
Great tutorial otherwise though
hammock seat on 06.22.2016 at 01:41 AM
This is interesting..Thank you for posting
Yhaceed on 11.22.2016 at 20:31 PM
Hi
I’d like to make a hammock but I don’t know what design I want to use. Basically I’d just like to know with the hammock you describe would it be big enough for two people or would one need more rope for two people? I appreciate any response and will understand if I don’t get one as I know you wrote this a while back.
Thanks
Want your image to appear next to your comment? Get a gravatar!Leave A Comment