
In this month’s Deconstruction, Ian Riedel of Sonoma-based metal fabrication studio, Werken Design, leads us through the process of creating a rusted steel and reclaimed wood table. We get to see how the design evolves, through whim and necessity, hearing his musings along the way. We learned about his studio through CustomMade, an online marketplace that connects customers with the skilled makers.

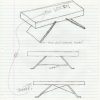
The first sketch is inspired by the image of an inverted fighter jet’s tail section. My initial intention is to use simple rectangular plates as legs. Cost of fabrication is kept low (it’s the economy) and simple: legs are two rectangles of 3/8” steel plate with a rusted finish, topped with a large knotted slab of readily available wood.

The basic layout is transferred to CAD at this point, where lines are pushed, dragged, deleted, and redrawn, resulting in the above profile. I trim the wood to a slim top (big wood is costly) and determine that some form of cross bracing is needed for support.

Rather than using just the shape of the fighter jet’s tail, I decide to employ the requirements of airplane design and attempt to trim the 3/8” steel plate to the bare minimum required for support. Flipping through a Hector Guimard book, I use curved lines, and decide to cut away at the original rectangular legs. (Screw the economy.)

Magic of modern manufacture! This is the most amazing part for me. Having finished all the drawings in detail, I send the CAD file to a production LASER cutter. In the most awesome of Buck-Rogers-Han-Solo-Star-Wars way, my drawings are rendered in steel in minutes, and with an accuracy of a few thousandths of an inch. Seriously . . . a little beam of really bright light cuts this stuff. Freaking awesome! Not quite the personal jet-pack I’ve always dreamed of, but close.

De-burring of laser cut parts is quick work. The micro-rippled edge of the cut surface is left intact to add interest to the surface. What I originally envisioned—the rusted-rectangular-legged-Japanese-styled-heavy-slab bench—has turned into a far different beast.

All preliminary finish work complete, I prepare to bend the tabs at the top and bottom of each leg into shape. CRAP! Too much dragging and deleting in CAD has led to a manufacturing headache. The problem: initially I drew the top edge of the leg to accommodate tooling for the bending process, but later, I went back to the drawing board to work on the look without considering manufacturing restraints. The result: a trimmed but unbendable leg at the point it attaches to the wood top. What to do? This is a problem best solved in repose with beer in hand. Eventually I decide to cut away one section of each leg so that the press-brake can bend it. Later I weld in a replacement to the cut-out sections. I make notes on the drawings that I must redraw this detail.

The original design that called for diagonal bracing or tensioned cable has given way to an arched dog-bone brace. I bend it on a simple wood form.

The legs are clamped together ready for welding. The arch is dropped into place to make sure it lines up with the legs. Now I’m ready to weld. I’m often called a welder, but as is often the case I spend less than two minutes actually welding this piece.

I test-assemble the legs with all hardware in place. Everything fits well, so I disassemble, chemically strip the black mill-scale (a kind of high-temperature “rust” left over from original manufacture of the steel plate itself), and apply a chemical blackening for the patina, followed by a sealer.

I cut and test fit the bench top. It’s reclaimed Douglas fir lumber that is more than 100 years old. Its dimensions are 2”x12”. I found this wood in a stack of old floor joists from a torn-down warehouse on the Petaluma riverfront. Of all the well-worn wood, this piece had the most knots and nail scars.

Usually I contract wood portions of jobs to one of several wood shops I work with. This particular project I will undertake myself. Not being a trained woodworker has its benefits. I’m not shrouded in the rules of the trade. There’s a bench in Yosemite park polished by the asses of time into the most magnificent natural shine, with the most beautiful revealing texture of wood grain. This is my guide. Of course, not being a trained woodworker has its drawbacks too. I’m attempting to recreate a finish that has taken decades and tens of thousands of unknowing participants to achieve. Slap something on, sand it off, repeat.

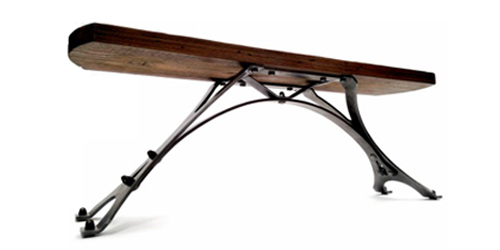
Here’s the finished bench compared to its original sketch. Evolution happens.

I’m happy with the results. The heavy steel plate leg is trimmed at the center to its bare minimum of 2 inches, implying lightness. Felt glides make the feet safe for the most delicate of floors, and also float the bench 1/4” off the ground, revealing light between metal and floor.

The patina is a dull patchy scratchy grey-to-black that I’ve mostly burnished off to allow the natural silver color of steel to show through. The hardware is a slightly darker tone so it visually pops from the legs.
The completed project! I’ve decided that for future versions, the two legs will be cut as one panel in order to simplify the manufacturing process (fewer parts, less assembly time, and two welds not 10). I’m already picturing variations: rusted steel; finely-finished stainless; recessed hardware for a more modern take; a crisply finished wood top. I’m currently exploring the cost and viability of doing the top in glass. I am also going to revisit the original sketch as all steel construction to see where that leads.